Welcome To NetTech Solutions

Warm Welcome to Every Visitor. Here we serve best technical support, all the posts here you find will help you solving and facing the day to day problems.
Every one is welcome to comment on our Posts.

Thursday, June 12, 2008

Windows XP Service Pack 2 Support Tools

This article describes updates to the Windows Support Tools that are included in Microsoft Windows XP Service Pack 2 (SP2). If you are a support person or a network administrator, you can use the Windows Support Tools to manage networks and to troubleshoot problems.

Windows XP SP2 includes updates for the following Support Tools:

• Ipseccmd.exe
• Httpcfg.exe
• Replmon.exe
• Iadstools.dll
• Extract.exe
• Bitsadmin.exe
• Netdom.exe

The Support Tools are not automatically installed when you install Windows XP SP2. To install the Support Tools on a computer that is running Windows XP, run the Setup.exe file from the \Support\Tools folder on the Windows XP CD.

The Windows XP Support Tools Help file is located in the Support.cab file. This Help file includes a description of each file and its associated syntax, sample output, and notes. See this Help for specific usage information for these tools. For additional help, type tool name/help at a command prompt, and then press ENTER.

Ipseccmd.exe

Use the Ipseccmd.exe tool to manage and monitor IPSec policies on computers that are running Windows XP. This tool has been updated to provide the following features:

• Support for policy import or export operations.
• Improved online help that you can access by using the /? option.
• The removal of the Active Directory directory service storage option.
• A persistent storage option.
• A Show option to generate Group Policy object information.
• The ability to dynamically turn on or turn off Oakley logging.

HTTPCfg.exe

The HTTP Configuration Utility (Httpcfg.exe) is included in the Microsoft Windows Server 2003 Support Tools. This tool is now included with the Windows XP Support Tools. Use this tool to set, delete, and query configuration information such as Namespace Reservation information, SSL Server Certificate information, and IP Listen List information for the HTTP driver (HTTP.SYS).


Replmon.exe

With the Active Directory Replication Monitor tool (Replmon.exe), you can view Active Directory replication, synchronization, and topology. This file is updated to resolve a problem where Replmon.exe cannot display more than 200 replication partners. In this scenario, Replmon.exe logs an error that is similar to the following error:

### iadstools.log
Warning Application c:\temp\iadstools.log: Thread ID: 2488 ,Logged:

Windows XP Setup Cannot Continue

When you run Windows XP Setup, you may experience one of the following symptoms:
• You may receive an error message that is similar to the following:

Fatal Error: An error has been encountered that prevents setup from continuing.
One of the components that Windows needs to continue setup could not be installed.
Press OK to view the setup log file.

• Setup may stop unexpectedly, you receive a black screen with a blinking cursor, and then the computer restarts.

This issue may occur if Setup cannot correctly read files from the Windows XP CD.

RESOLUTION

To resolve this issue, follow these steps:

1. Remove the Windows XP CD from the CD-ROM or DVD-ROM drive, and examine it for damage or scratches. If the CD shows any signs of damage, skip the following steps. Use the information that is listed at the end of the "Resolution" section of this article to obtain a replacement CD from Microsoft. If you have to, clean the CD.

2. If you upgrade to an existing installation of Windows, follow these steps:

a. Insert the Windows XP CD in the CD-ROM or DVD-ROM drive.
b. Click Start, click Run, type cmd in the Open box, and then press ENTER.
c. At the command prompt, type xcopy CD-DriveLetter\I386\*.* c:\i386\*.* /s /e, and then press ENTER. For example, if your CD-ROM or DVD-ROM drive is designated as d:, type d:\I386\*.* c:\i386\*.* /s /e.

Note Because of the size of the I386 folder, this process may take a few minutes.
d. Type c:\i386\winnt32.exe, and then press ENTER.

3. If you install Windows XP on a computer that is not currently running Windows, follow these steps:

a. Insert a Microsoft Windows Millennium Edition (Me) or Microsoft Windows 98 Startup disk in the floppy disk drive, and then restart the computer.
b. Insert the Windows XP CD in the CD-ROM or DVD-ROM drive.
c. Type xcopy CD-DriveLetter\I386\*.* c:\i386\*.* /s /e, and then press ENTER. For example, if your CD-ROM or DVD-ROM drive is designated as d:, type d:\I386\*.* c:\i386\*.* /s /e.

Note Because of the size of the I386 folder, this process may take few minutes.
d.Type c:\i386\winnt.exe, and then press ENTER.

Windows XP SP2 Firewall blocks offers of Remote Assistance

When you use the Windows XP, Help and Support, Offer Remote Assistance to offer assistance to a computer running Windows XP Service Pack 2, you get the message "The remote server machine does not exist or is unavailable".

This happens even when the following are true on the target computer:

1. The Windows Firewall configuration has these Exceptions enabled:
a. File and Print Sharing
b. Remote Assistance
and
2. This policy setting is Enabled (either locally using gpedit.msc, or in a Windows 2000 or 2003 Domain using Group Policies):
Computer Configuration/Administrative Templates/System/Remote Assistance/Offer Remote Assistance
and
3. The (expert) user logged on at the source computer (the user making the Offer of Remote Assistance) is in the list of "Helpers" in the "Offer Remote Assistance" policy setting.

CAUSE

The Windows XP SP2 Firewall Exception Remote Assistance does not include all of the settings required so that the Windows Firewall will allow the incoming Remote Assistance offers to be received.

RESOLUTION

Add these Exceptions to the Windows Firewall configuration (Start, Control Panel, Windows Firewall, Exceptions):

1. Programs
a. %systemroot%\system32\sessmgr.exe
b. %systemroot%\PCHEALTH\HELPCTR\Binaries\helpsvc.exe

2. TCP 135

Note: The pre-defined Exception - Remote Assistance - includes the exception for sessmgr.exe; in most cases, you do not have to explicitly add the Program Exception for sessmgr.exe.

To configure these exceptions using local policies or Group Policies (in a Windows 2000 or 2003 Domain), add the following settings under Computer Configuration\Administrative Templates\Network\Network Connections\Windows Firewall. For computers in a Windows 2000 or 2003 domain, these would normally be added under the Domain profile. For computers not in a Windows domain, these must be added under the Standard profile (see http://www.microsoft.com/technet/community/columns/cableguy/cg0504.mspx for how a computer determines which profile to use).

Windows Firewall: Define program exceptions: Enabled:
%systemroot%\system32\sessmgr.exe:*:enabled:sessmgr.exe
%systemroot%\PCHEALTH\HELPCTR\Binaries\helpsvc.exe:*:enabled:helpsvc.exe

Windows Firewall: Define port exceptions: Enabled
135:TCP:*:enabled:Port 135

Note: the "*" enables the exception for any IP address (including any on the public Internet). To limit access to these exceptions only from computers in the same IP subnet (the local network - LAN), replace the * with the word localsubnet.

MORE INFORMATION

There are two modes of Remote Assistance:

- Solicited, in which the novice sends a request for assistance to an expert (e.g. via email) and the expert responds to start the Remote Assistance session
- Offered, in which the expert initiates the Remote Assistance session by sending an offer to the novice's computer

In Windows XP, there is no shortcut pre-defined for Offer Remote Assistance. To Offer Remote Assistance from a Windows XP workstation:
1. click Start, Help and Support
2. click Use Tools to view your computer information and diagnose problems or key the word offer in the Search text box and press Enter (or click the button with the white arrow on the green button)
3. click Offer Remote Assistance under Tools or Suggested Topics

The pre-defined Windows Firewall Exception Remote Assistance allows Solicited Remote Assistance to work, but not Offered Remote Assistance.

To receive Offers of Remote Assistance, the target (novice's) computer must accept incoming connections to sessmgr.exe, helpsvc.exe and on TCP port 135. By default, the Windows XP SP2 Windows Firewall feature blocks incoming connections to sessmgr.exe, helpsvc.exe and TCP port 135.

If the pre-defined Exception called Remote Assistance is enabled, incoming connections to sessmgr.exe are already allowed.

Windows XP stops responding when you download updates from Windows Update

When you try to download an update from the Windows Update Web site on a Windows 2000-based computer or a Windows XP-based computer, you may experience either of the
following symptoms:

•You receive the following error message:

Initialization error 0x8007007e

In the Windows Update.log file in the Windows directory, you may receive a message that is similar to the following message:
Error IUENGINE Determining machine configuration (Error 0x8007007E: The specified module could not be found.)

•Your computer may stop responding after you accept the end-user license agreement.

CAUSE

This issue may occur if there are corrupted or unregistered system files on your computer.

RESOLUTION

To resolve this issue, use the following methods as appropriate for your operating system in the order that they are presented.

Windows XP

To check the system files, follow these steps:

1.Click Start, click Run, and then type:Cmd.exe
2.Click OK.
3.Type:
SFC.exe /scannow
4.Press ENTER. Windows verifies the protected Windows files and may prompt you to insert the Windows XP CD to restore the files.
5.When the file check is complete, type:
exit
6.Press ENTER.

Windows 2000

Method 1: Register your system files
To register your system files, follow these steps:
1.Click Start, click Run, and then type:
regsvr32 /i Urlmon.dll
2.Click OK.
3.When you receive the "DllRegisterServer in urlmon.dll succeeded" message, click OK, and then try to use the Windows Update site.
4.If the problem repeats, repeat steps 1-3 for each of the following commands:
•regsvr32 /i Shdocvw.dll
•regsvr32 Msjava.dll
•regsvr32 Actxprxy.dll
•regsvr32 Oleaut32.dll
•regsvr32 /i Mshtml.dll
•regsvr32 /i Browseui.dll
•regsvr32 /i Shell32.dll
If the issue is not resolved, some system files may be incorrect. Go to the next method.

Method 2: Run the Internet Explorer Repair Tool

To run the Internet Explorer Repair Tool, follow these steps:
1.Click Start, point to Settings, and then click Control Panel.
2.Double-click Add/Remove Programs.
3.On the Change or Remove Programs tab, click Microsoft Internet Explorer.
4.Click Change/Remove, select the Repair Internet Explorer check box, and then click OK.
5.When you are prompted to detect and repair problems with Internet Explorer, click Yes.

If the issue is not resolved, go to the next method.

Method 3: Install Microsoft XML Parser

To obtain the latest version of the Microsoft XML Parser, visit the following Microsoft Web site:

http://www.microsoft.com/downloads/details.aspx?

FamilyId=2CF40AE6-368C-4B6B-A185-2DFA92FB7993&displaylang=en

(http://www.microsoft.com/downloads/details.aspx?FamilyId=2CF40AE6-368C-4B6B-A185-2DFA92FB7993&displaylang=en)

After you install the XML Parser, try to connect to the Windows Update site.

Tuesday, June 10, 2008

The "Shutdown" button on the startup login dialog box is missing

The "Shutdown" button that allows users to shutdown a system without logging in might be not available, if the default value in the registry is changed. This setting will be applied on Servers normally.

Click Start, Run.
Type regedit and click OK.
Navigate to the following registry key:

HKEY_LOCAL_MACHINE\SOFTWARE\Microsoft\Windows\CurrentVersion\policies\system

Look for the "ShutdownWithoutLogon" key and change the value.
Value 0 = disabled, 1 = enabled

If the above key is not available, you can create the same.

NOTE: It is recommended to backup the registry before dealing with it. Incorrect changes may cause severe damages. Visit the following web site to know about backing up/restoring Windows registry:

http://support.microsoft.com/default.aspx?scid=kb;en-us;322756

Improper Shutdown May Affect System Restore

When you use System Restore to perform a restoration to your system, System Restore may not restore all files as expected. You may also receive the following error message when you restart the computer after the restore process:

System Restore
Restoration Incomplete
Your computer cannot be restored to:
Date
Restore Point Name
This restoration is incomplete. It was interrupted by an improper shutdown. You should undo this restore or choose another restore point.
To choose another restore point, restart System Restore.

This behavior can occur when the computer is not shut down properly. For example, this issue occurs when there is an accidental or intentional improper shutdown during the restoration process.

To resolve this issue, you can restore to the same restore point again, or undo the first restore.

Method 1: Choose the Same or Another Restore Point

1.Start System Restore.
2.Click Restore my computer to an earlier time, and then click Next.
3.Choose a restore point from the System Restore Calendar in the Select a Restore Point dialog box, and then click Next.

Method 2: Undo the Previous Restoration

1.Start System Restore.
2.Click Undo my last restoration, and then click Next.

When a computer is improperly or forcibly shut down during a restore process, either accidentally or intentionally, the machine may be in a state in which only some files have been restored.

If an improper shutdown happens at any other time (not during restoration), and a restore is done to a point before the improper shutdown, there is a small possibility that such a restore might fail, due to the fact that some file operations might not have been logged properly by System Restore. The system will be in the same state as before the restore was initiated

"Shutdown" option missing from the Start Menu and Ctrl+Alt+Del dialog box

To resolve the issue, perform the following:

Click Start, Run.
Type gpedit.msc and click OK.
Navigate to the following path:

User Configuration\Administrative Templates\Start Menu and Taskbar

Double-click "Remove and Prevent Access to the Shut Down command"
Select "Not configured" or "Disabled"
Close Group Policy window.

How to enable and disable Shutdown Event Tracker

How to enable and disable Shutdown Event Tracker

1.To open Registry Editor, click Start, click Run, type regedit, and then click OK.

2.In Registry Editor, navigate to the following registry key:
HKEY_LOCAL_MACHINE\Software\Microsoft\Windows\CurrentVersion\Reliability

3.Name:ShutdownReasonUI
Type:REG_DWORD
Value:1=enable;0=disable


For more information see the KB Article(293814):-Description of the Shutdown Event Tracker
http://support.microsoft.com/default.aspx?scid=kb;en-us;293814

[Note:-Shutdown Event Tracker is not a functional component in Windows XP Home Edition]

Description of the Shutdown Event Tracker

Windows Server 2003 and Windows XP 64-Bit Edition Version 2003

By default, Shutdown Event Tracker is enabled for all Windows Server 2003 operating systems and for Windows XP 64-Bit Edition Version 2003.

To disable Shutdown Event Tracker on all Windows Server 2003 operating systems and in Windows XP 64-Bit Edition Version 2003, disable the Display Shutdown Event Tracker policy by using Group Policy. To do this by using Local Group Policy, follow these steps:

1.Click Start, and then click Run.
2.Type gpedit.msc, and then click OK.
3.Expand Computer Configuration, expand Administrative Templates, and then expand System.
4.Double-click Display Shutdown Event Tracker.
5.Click Disabled, and then click OK.

Windows XP Professional

By default, Shutdown Event Tracker is disabled in Windows XP Professional.

To enable Shutdown Event Tracker in Windows XP Professional, in Windows XP Tablet PC Edition, and in Windows XP Media Center Edition, enable the Display Shutdown Event Tracker policy by using Group Policy. To do this by using Local Group Policy, follow these steps:

1.Click Start, and then click Run.
2.Type gpedit.msc, and then click OK.
3.Expand Computer Configuration, expand Administrative Templates, and then expand System.
4.Double-click Display Shutdown Event Tracker.
5.Click Enabled.
6.In the Shutdown Event Tracker should be displayed box, click Always, and then click OK.
Shutdown Event Tracker is not a functional component in Windows XP Home Edition. Therefore, you cannot use Shutdown Event Tracker in Windows XP Home Edition.

Note Microsoft recommends that you do not enable the Shutdown Event Tracker in Windows XP Professional, Windows XP Tablet PC, or Windows XP Media Center Editions. Microsoft does not support the use of this component in these Windows XP environments.

Custom Options for Identifying a Shutdown Cause

Important This section, method, or task contains steps that tell you how to modify the registry. However, serious problems might occur if you modify the registry incorrectly. Therefore, make sure that you follow these steps carefully. For added protection, back up the registry before you modify it. Then, you can restore the registry if a problem occurs. For more information about how to back up and restore the registry, click the following article number to view the article in the Microsoft Knowledge Base:
322756 (http://support.microsoft.com/kb/322756/) How to back up and restore the registry in Windows


Windows provides a list of eight generic reasons why your computer was shut down. You can modify this list to include your own custom reasons. To add your own reasons, follow these steps:

1.Start Registry Editor.
2.Locate and then click the following registry key:
HKEY_LOCAL_MACHINE\Software\Microsoft\Windows\CurrentVersion\Reliability\UserDefined
3.On the Edit menu, click New, and then click Multi-String Value. This creates the new key and gives it the temporary name "New Value."
4.Type the name of the registry key in the following format, and then press ENTER:
UI_control_flags;major_reason_number;minor_reason_number
The UI_control_flags section of the value name can contain one or more of the following values:
P (Indicates that the reason is planned. If this value is omitted, the default is unplanned.)
C or B (Indicates that a comment is required.)
S (Indicates that the reason should be displayed in the user-initiated shutdown dialog box.)
D (Indicates that the reason should be displayed in the sudden shutdown dialog box.)
For example, if you want a reason to be displayed in the sudden shutdown dialog box, the shutdown is unplanned, and the shutdown corresponds to a major reason 2 and to a minor reason 2, type the following value name:
D;2;2
5.Double-click the new key, and then define the value data in the following format:
Title

Description
Each value is made up of two strings on separate lines; the first string is the title (this is displayed in the list) and the second string is the description (this is the text that is displayed following the selected reason).

For example, if you want to create a custom reason for a natural disaster, you can define the value data as follows:
Natural Disaster (unplanned)

A flood, an earthquake, a tornado, or another unplanned natural event requires that the computer be shut down. Specify the natural event in the comment area.
6.Quit Registry Editor.


Notes

You can specify both S and D for UI_control_flags, but you must specify at least one of them for the parameters to be valid.
If the UI_control_flags section contains any characters other than the characters that are listed in the "Custom Options for Identifying a Shutdown Cause" section of this article, or if the UI_control_flags section exceeds five characters, the message is not valid and is not displayed in the user interface. You can specify that the characters appear in any order.
The major_reason_number is a number from 0 through 255. If this section is left blank, if it contains a number that is not in the valid range, or if it contains a number that is not an integer, the message is not valid and is not displayed in the user interface.
The minor_reason_number is a number from 0 through 65,536. If this section is left blank, if it contains a number that is not in the valid range, or if it contains a number that is not an integer, the message is not valid and is not displayed in the user interface.
The custom reasons are sorted in the user interface by two keys in the following order: MajorReasonNumber, MinorReasonNumber.
The maximum length for the title is 64 characters, and the maximum length for the description is 96 characters.
If you set the following registry key to any non-zero value, and you have correctly defined at least one custom reason, the standard Windows reasons are not displayed in the Shut Down Windows dialog box:
HKEY_LOCAL_MACHINE\SOFTWARE\Microsoft\Windows\CurrentVersion\Reliability\ShutdownIgnorePredefinedReasons

Advanced troubleshooting for shutdown problems in Windows XP

This article describes how to troubleshoot difficulties that may occur when you try to shut down Windows XP. This article is intended for advanced computer users. If you are not comfortable with advanced troubleshooting, you might want to ask someone for help or contact support. For information about how to contact support, visit the following Microsoft Web site:
http://support.microsoft.com/contactus/ (http://support.microsoft.com/contactus/)
Note Before you begin, make sure that the latest Service Pack and updates are installed on your computer. For more information about how to obtain the latest Windows XP service pack and updates, click the following article number to view the article in the Microsoft Knowledge Base:
322389 (http://support.microsoft.com/kb/322389/) How to obtain the latest Windows XP service pack

You receive an error message when you shut down or restart the computer

To resolve this issue, use either of the methods.

Method 1: Configure Windows so that it does not load the file or the service mentioned in the error message

If the error message refers to a file or service, the file or service may be listed on one of the tabs in the System Configuration utility (Msconfig.exe). If the file or service is listed, follow the procedure outlined in the second article mentioned in this section to turn it off. If the file or service is not listed, continue with the next troubleshooting step in this article.

For more information about disabling a file or service using the System Configuration utility, click the following article number to view the article in the Microsoft Knowledge Base:
310353 (http://support.microsoft.com/kb/310353/) How to perform a clean boot in Windows XP
For more information about how to turn off services using Computer Management, click the following article number to view the article in the Microsoft Knowledge Base:
310602 (http://support.microsoft.com/kb/310602/) How to disable a service or device that prevents Windows from starting
Contact the manufacturer of the faulty service for more information.

Note For more information about the file or service that is causing the problem, contact a Microsoft Customer Support Services professional for help. For information about how to contact a Support Services professional, visit the following Microsoft Web site:
http://support.microsoft.com (http://support.microsoft.com/)
If the OEM of your computer installed Windows XP, contact this manufacturer for help with this issue.

Method 2: See whether a program has recently been removed from the computer

If you recently removed a program or a Windows component from the computer by deleting it manually, related information that is still on your computer may be causing the problem. Reinstall the program or component, and then either use the Add or Remove Programs tool or follow the manufacturer's instructions to remove it.

To remove a program from the computer:
1.Click Start, click Control Panel, and then click Add or Remove Programs.
2.In the list of programs, click the program that you want to remove, and then click Change/Remove.
3.Click Yes when you are prompted to confirm if you want to remove the program.
If the program is not listed in the Add or Remove Programs tool, contact the manufacturer to obtain instructions for removing it.

The computer stops responding when you try to shut down or restart the computer

To resolve this problem, use any of the methods that are described in the following sections.

Method 1: Try to shut down or restart the computer from safe mode

For more information about troubleshooting Windows XP by using safe mode, click the following article numbers to view the articles in the Microsoft Knowledge Base:
315222 (http://support.microsoft.com/kb/315222/) A description of the safe mode boot options in Windows XP
310602 (http://support.microsoft.com/kb/310602/) How to disable a service or device that prevents Windows from starting
Note If you can shut down or restart your computer from safe mode, continue to the next section to troubleshoot possible driver issues.

Method 2: Use Device Manager to determine if the problem is related to a device driver

You can use Device Manager to examine and change devices that are configured by software. Note that if the hardware device uses jumper pins or dip switches, you must configure the device manually.

For more information, click the following article numbers to view the articles in the Microsoft Knowledge Base:
310126 (http://support.microsoft.com/kb/310126/) Troubleshooting device conflicts with Device Manager
314464 (http://support.microsoft.com/kb/314464/) How to troubleshoot unknown devices listed in Device Manager

Method 3: Try to restore operation of Windows XP by using System Restore

You can use the System Restore tool to return your computer to a previous working state. System Restore takes a "snapshot" of critical system files and some program files and stores this information as restore points. You can use these restore points to return Windows XP to a previous state.

For more information about using the System Restore tool, click the following article number to view the article in the Microsoft Knowledge Base:
306084 (http://support.microsoft.com/kb/306084/) How to restore the operating system to a previous state in Windows XP
For additional information about System Restore, click Help and Support on the Start menu. In the Search box, type system restore, and then press ENTER.

Method 4: Try to restore operation of Windows XP by using the Last Known Good Configuration functionality

If Windows does not start, restart Windows by using the Last Known Good Configuration functionality:
1.Start the computer, and when Windows begins to start, press F8 to make the Windows Advanced Options menu appear.
2.Use the arrow keys to select Last Known Good Configuration (your most recent settings that worked), and then press ENTER.
3.If a Boot menu appears, use the arrow keys to select Microsoft Windows XP, and then press ENTER.

Windows XP starts your computer by using the registry information that was saved at the last shutdown.

Method 5: Try to repair your installation of Windows XP by performing an in-place upgrade

You can repair a damaged Windows installation if you run Windows Setup from the Windows XP CD-ROM.

For more information about how to perform an in-place upgrade of Windows XP, click the following article number to view the article in the Microsoft Knowledge Base:
315341 (http://support.microsoft.com/kb/315341/) How to perform an in-place upgrade (reinstallation) of Windows XP

Method 6: Confirm that the CMOS/BIOS settings are correct

Warning This procedure may involve changing the complementary metal oxide semiconductor (CMOS) settings and modifying the basic input/output system (BIOS) settings. Incorrect changes to your computer's BIOS can result in serious problems. Microsoft cannot guarantee that problems resulting from changes to your BIOS can be solved. Change your CMOS settings at your own risk.

Incorrect or corrupted CMOS and BIOS settings can cause startup and shutdown problems. Microsoft cannot provide specific instructions to change your CMOS and BIOS settings, because these settings are specific to your computer.

For information about the correct CMOS and BIOS settings for your computer and about how to check and change these settings, see your computer documentation or contact the manufacturer of your computer.

Note A damaged or insufficiently charged internal battery can corrupt CMOS or BIOS settings.

Method 7: Confirm that your hard disk or file system is not damaged

You may be able to resolve the problem if you start your computer from the Windows XP CD-ROM, load the Microsoft Recovery Console, and then use the Chkdsk command line utility.

Important Microsoft recommends that only advanced users or administrators use the Recovery Console. You must know the administrator's password to use the Recovery Console.

For more information about how to check and repair a damaged hard disk using Chkdsk, see the 'Using the Recovery Console' and 'Using the Recovery Console Command Prompt' sections in the following article, click the following article number to view the article in the Microsoft Knowledge Base:
307654 (http://support.microsoft.com/kb/307654/) How to install and use the Recovery Console in Windows XP
Note If the Chkdsk command reports that it cannot access your hard disk, you may have a hardware failure. Check all of your cable connections and any jumper settings on your drive. Ask either a computer repair professional or the manufacturer of your computer for more help.

If the chkdsk command reports that it was unable to fix all hard drive problems, your file system or Master Boot Record (MBR) may be damaged or be no longer accessible. Explore appropriate Recovery Console commands such as fixmbr and fixboot, contact a data recovery service, or repartition and reformat your hard disk.

Note If you repartition and reformat your hard disk, you will lose all of the information on the disk.

Important For more help with this issue, contact either your computer manufacturer or a Microsoft Product Support Services professional.

Microsoft recommends that you ask only qualified personnel to repair your computer. Computer repair performed by non-qualified personnel can void your computer's warranty.

The shutdown procedure takes a long time to complete

SYMPTOMS

The shutdown procedure on certain hardware configurations can take up to 15 minutes to complete.

For example, the Toshiba Satellite 5200 laptop computer that is equipped with a universal serial bus (USB) 1.1 mouse can demonstrate this problem.

CAUSE

This problem occurs because of an issue with the Microsoft Windows XP audio service.

RESOLUTION

Service pack information

To resolve this problem, obtain the latest service pack for Windows XP. For more information, click the following article number to view the article in the Microsoft Knowledge Base:
322389 (http://support.microsoft.com/kb/322389/) How to obtain the latest Windows XP service pack

Hotfix information

The audio service has been updated to correct this problem.

A supported hotfix is available from Microsoft. However, this hotfix is intended to correct only the problem that is described in this article. Apply this hotfix only to systems that are experiencing this specific problem. This hotfix might receive additional testing. Therefore, if you are not severely affected by this problem, we recommend that you wait for the next software update that contains this hotfix.

If the hotfix is available for download, there is a "Hotfix download available" section at the top of this Knowledge Base article. If this section does not appear, contact Microsoft Customer Service and Support to obtain the hotfix.

Note If additional issues occur or if any troubleshooting is required, you might have to create a separate service request. The usual support costs will apply to additional support questions and issues that do not qualify for this specific hotfix. For a complete list of Microsoft Customer Service and Support telephone numbers or to create a separate service request, visit the following Microsoft Web site:
http://support.microsoft.com/contactus/?ws=support (http://support.microsoft.com/contactus/?ws=support)
Note The "Hotfix download available" form displays the languages for which the hotfix is available. If you do not see your language, it is because a hotfix is not available for that language. The English version of this hotfix has the file attributes (or later file attributes) that are listed in the following table. The dates and times for these files are listed in Coordinated Universal Time (UTC). When you view the file information, it is converted to local time. To find the difference between UTC and local time, use the Time Zone tab in the Date and Time tool in Control Panel.
   Date         Time   Version            Size    File name
--------------------------------------------------------------
10-Jun-2003 20:06 5.1.2600.1233 38,912 Audiosrv.dll

STATUS

Microsoft has confirmed that this is a problem in the Microsoft products that are listed in the "Applies to" section. This problem was first corrected in Microsoft Windows XP Service Pack 2.

How to use the Microsoft Product Support Services Web site to find a solution


Searchable Knowledge Base
To search technical support information and self-help tools for Microsoft products, visit the following Microsoft Web site:
http://support.microsoft.com/search?ln=en-us&sd=gn (http://support.microsoft.com/search?ln=en-us&sd=gn)


Frequently asked questions

To view product-specific frequently asked questions and support highlights, visit the following Microsoft Web site:
http://support.microsoft.com/default.aspx?scid=fh;[ln];winxpfaq&product=winxp (http://support.microsoft.com/default.aspx?scid=fh;%5Bln%5D;winxpfaq&product=winxp)


Microsoft Product Support newsgroups

To contact your peers and Microsoft Most Valuable Professionals (MVPs), visit the following Microsoft Web site:
http://www.microsoft.com/communities/newsgroups/en-us/default.aspx (http://www.microsoft.com/communities/newsgroups/en-us/default.aspx)


Software and software updates

To find software and software updates at the Microsoft Download Center, visit the following Microsoft Web site:
http://www.microsoft.com/downloads/Search.aspx (http://www.microsoft.com/downloads/Search.aspx)


Other support options
To ask a support question by using the Web, to call Microsoft Product Support Services, or to provide feedback, visit the following Microsoft Web site:

How to change the logon window and the shutdown preferences in Windows XP

Use the classic logon screen

To temporarily use the classic logon screen, press CTRL+ALT+DEL two times on the Welcome logon screen.

To configure Windows XP to use the classic logon and shutdown screens for every logon session, follow these steps:
1.Click Start, and then click Control Panel.
2.Double-click User Accounts.
3.Click Change the way users log on or off.
4.Clear the Use the Welcome screen check box.
Note If you turn off the Welcome logon screen, you also turn off the Fast User Switching
option.

Require users to press CTRL+ALT+DEL before the classic logon screen appears

Important This section, method, or task contains steps that tell you how to modify the registry. However, serious problems might occur if you modify the registry incorrectly. Therefore, make sure that you follow these steps carefully. For added protection, back up the registry before you modify it. Then, you can restore the registry if a problem occurs. For more information about how to back up and restore the registry, click the following article number to view the article in the Microsoft Knowledge Base:
322756 (http://support.microsoft.com/kb/322756/) How to back up and restore the registry in Windows


If you want users to have to press CTRL+ALT+DEL before the classic logon appears like a Windows XP-based computer that is joined to a domain, follow these steps:
1.Click Start, click Run, type regedit in the Open box, and then click OK.
2.Click the Winlogon subkey at the following registry location:
HKEY_LOCAL_MACHINE\SOFTWARE\Microsoft\Windows NT\CurrentVersion\Winlogon
3.Click Edit, click New, and then click DWORD value.
4.To change the value name, type DisableCAD, and then press ENTER.
5.Keep the data value set to 0. The data value set appears as 0x00000000(0).

Advanced troubleshooting for general startup problems in Windows XP

This article describes how to troubleshoot difficulties that may occur when you try to start Windows XP. This article is intended for advanced computer users. If you are not comfortable with advanced troubleshooting, you might want to ask someone for help or contact support. For information about how to contact support, please visit the following Microsoft Web site:

You receive an error message when you start your computer

If you receive an error message when you start your computer, follow the steps that are described in the following two sections. If you do not receive an error message when you start your computer, go to the "Your computer stops responding when you try to start Windows XP" section.

Configure Windows not to load the file or the service that is mentioned in the error message

If the error message refers to a file or service, the file or service may be listed on one of the tabs in the System Configuration Utility (Msconfig.exe). If the file or service is listed, turn it off by following the procedure that is outlined in the article below. If the file or service is not listed, continue with the next troubleshooting step in this article.

For more information about how to turn off a file or service by using the System Configuration Utility, click the following article number to view the article in the Microsoft Knowledge Base:
310353 (http://support.microsoft.com/kb/310353/) How to configure Windows XP to start in a "clean boot" state
For more information about how to turn off services by using Computer Management, click the following article number to view the article in the Microsoft Knowledge Base:
310602 (http://support.microsoft.com/kb/310602/) How to disable a service or device that prevents Windows from starting
Contact the manufacturer of the faulty service for more assistance.

Note For more information about the file or service that is causing the problem, contact a Microsoft Product Support Services professional for help. For information about how to contact a Support Services professional, visit the following Microsoft Web site:
http://www.microsoft.com/support (http://support.microsoft.com/?scid=http%3a%2f%2fwww.microsoft.com%2fsupport)
If the original equipment manufacturer (OEM) of your computer installed Windows XP for you, call them for help with this issue.

Determine if a new program was recently installed on your computer

If you recently removed a program or a Windows component from your computer by deleting it manually, related information that is still on your computer may be causing the problem. To remove the program or component, first reinstall it, and then use the Add or Remove Programs tool, or follow the manufacturer's instructions.

To remove a program from your computer, follow these steps:
1.Click Start, click Control Panel, and then click Add or Remove Programs.
2.In the list of programs, click the one that you want to remove, and then click Change/Remove.
3.Click Yes when you are prompted with the question "Do you want to remove the program?"
If the program is not listed in the Add or Remove Programs tool, contact the manufacturer to obtain instructions for removing it.

Your computer stops responding when you try to start Windows XP

If your computer stops responding when you try to start Windows XP, see the articles that are listed in the following sections, or follow the steps in the following sections.

Start your computer in Safe mode

For additional information about how to troubleshoot Windows XP by using Safe mode, click the following article numbers to view the articles in the Microsoft Knowledge Base:
315222 (http://support.microsoft.com/kb/315222/) A description of the Safe mode boot options in Windows XP
For information about how to disable a service or a device that prevents Windows from starting, see article 244905 in the "Recommended Knowledge Base articles" section.

Use Device Manager to determine if the problem is related to a device driver

You can use Device Manager to examine and change software-configurable devices. If your hardware device uses jumper pins or dip switches, you must configure the device manually.

For additional information about how to troubleshoot device conflicts by using Device Manager, see article 310126 in the "Recommended Knowledge Base articles" section. For additional information about how to troubleshoot unknown devices that are listed in Device Manager, see article 314464 in the "Recommended Knowledge Base articles" section.

Use the System Restore tool to restore the operation of Windows XP

You can use the System Restore tool to return your computer to a previous working state. System Restore takes a "snapshot" of critical system files and some program files and stores this information as restore points. You can use these restore points to return Windows XP to a previous state.

For additional information about how to use the System Restore tool, see article 305084 in the "Recommended Microsoft Knowledge Base articles" section.

For additional information about System Restore, click Help and Support on the Start menu. In the Search box, type system restore, and then click OK.

Use the Last Known Good Configuration tool to restore the operation of Windows XP

If Windows does not start, try to restore operation of Windows XP by using the Last Known Good configuration. To do this, follow these steps:
1.Start the computer, and then press the F8 key when Windows begins to start. The Windows Advanced Options menu appears.
2.Use the ARROW keys to select Last Known Good Configuration (your most recent settings that worked), and then click OK.
3.If a start menu appears, use the ARROW keys to select Microsoft Windows XP, and then click OK

Windows XP starts your computer by using the registry information that was saved at the last shutdown.

Perform an in-place upgrade to repair your installation of Windows XP

Try to repair your installation of Windows XP by doing an in-place upgrade. Running the Setup program from the Windows CD-ROM frequently repairs a damaged Windows installation.

For additional information about how to perform an in-place upgrade of Windows XP, click the following article number to view the article in the Microsoft Knowledge Base:
315341 (http://support.microsoft.com/kb/315341/) How to perform an in-place upgrade (reinstallation) of Windows XP

Confirm that your CMOS/BIOS settings are correct

Confirm that your CMOS/BIOS settings are correct.

Warning This procedure may involve changing your CMOS settings and changing your BIOS. Incorrect changes to the BIOS of your computer can result in serious problems. Microsoft cannot guarantee that problems resulting from changes to your BIOS can be solved. Change your CMOS settings at your own risk. Incorrect or corrupted CMOS and BIOS settings can cause startup problems or shutdown problems.

Microsoft cannot provide specific instructions for changing your CMOS and BIOS settings because they are specific to your computer. For information about the correct CMOS and BIOS settings for your computer and how to check and change these settings, see your computer documentation or contact the manufacturer of your computer.

Note An insufficiently charged or damaged internal battery may corrupt the CMOS or BIOS settings.

Confirm that your hard disk or file system is not damaged

Confirm that your hard disk or file system is not damaged. Start your computer from the Windows XP CD-ROM, load Microsoft Recovery Console, and then use the Chkdsk command-line utility. This may solve your problem.

Important We recommend that advanced users or administrators use the Recovery Console. You have to know the Administrator's password to use the Recovery Console.

For additional information about how to check and repair a damaged hard disk by using Chkdsk, see the "Using the Recovery Console" and "Using the Recovery Console command prompt" sections in the following article:
307654 (http://support.microsoft.com/kb/307654/) How to install and use the Recovery Console in Windows XP

Note If the Chkdsk command reports that it cannot gain access to your hard disk, you may have a hardware failure. Examine all cable connections and any jumper settings on your drive. For more assistance, contact a computer repair professional or the manufacturer of your computer.

If the Chkdsk command reports that it cannot fix all hard disk problems, your file system or Master Boot Record (MBR) may be damaged or no longer accessible. Try appropriate Recovery Console commands such as Fixmbr and Fixboot, contact a data recovery service, or repartition and reformat your hard disk.

Important For more help, contact your computer manufacturer or a Microsoft Product Support Services professional.

Allow only qualified personnel to repair your computer. Computer repair that is performed by non-qualified personnel may nullify your computer's warranty.

If you repartition and reformat your hard disk, you lose all the information on the disk.

After an upgrade, programs that previously loaded during startup no longer start

After you upgrade your computer from Microsoft Windows 95, Microsoft Windows 98, or Microsoft Windows Millennium Edition to Windows XP, the programs that previously loaded during the startup process may not be listed in the notification area (at the far right of the taskbar), and they do not start automatically when you start your computer.

For additional information about how to resolve this issue, see articles 298427 and 303561 in the "Recommended Knowledge Base articles" section.

Cannot Schedule a Windows XP-Based Computer to Shut Down and Restart by Using the AT Command with Shutdown.exe

RESOLUTION

Service pack information

To resolve this problem, obtain the latest service pack for Microsoft Windows XP. For additional information, click the following article number to view the article in the Microsoft Knowledge Base:
322389 (http://support.microsoft.com/kb/322389/EN-US/) How to obtain the latest Windows XP service pack

Hotfix information

A supported hotfix is available from Microsoft. However, this hotfix is intended to correct only the problem that is described in this article. Apply this hotfix only to systems that are experiencing this specific problem. This hotfix might receive additional testing. Therefore, if you are not severely affected by this problem, we recommend that you wait for the next software update that contains this hotfix.

If the hotfix is available for download, there is a "Hotfix download available" section at the top of this Knowledge Base article. If this section does not appear, contact Microsoft Customer Service and Support to obtain the hotfix.

Note If additional issues occur or if any troubleshooting is required, you might have to create a separate service request. The usual support costs will apply to additional support questions and issues that do not qualify for this specific hotfix. For a complete list of Microsoft Customer Service and Support telephone numbers or to create a separate service request, visit the following Microsoft Web site:
Note The "Hotfix download available" form displays the languages for which the hotfix is available. If you do not see your language, it is because a hotfix is not available for that language. The global version of this fix has the file attributes (or later) that are listed in the following table. The dates and times for these files are listed in coordinated universal time (UTC). When you view the file information, it is converted to local time. To find the difference between UTC and local time, use the Time Zone tab in the Date and Time tool in Control Panel.
Date         Time  Version           Size        File name
------------------------------------------------------------
18-Feb-2003 17:04 5.1.2600.1170 17,920 Shutdown.exe

WORKAROUND

To work around this problem, use Task Scheduler to schedule the computer to shut down and restart at a specific time. To do so, follow these steps:
1.Click Start, and then click Control Panel.
2.Click Performance and Maintenance, and then click Scheduled Tasks.
3.Double-click Add Scheduled Task. The Scheduled Task Wizard starts.
4.Click Next.
5.Under Click the program you want Windows to run, click Browse.
6.In the Select Program to Schedule dialog box, locate the %SystemRoot%\System32 folder, locate and click the Shutdown.exe file, and then click Open.
7.Under Perform this task, specify a name for the task and how frequently you want this task to run, and then click Next.
8.Under Select the time and day you want this task to start, specify a start time and date for the task, and then click Next.
9.Type the user name and password to run this task under, and then click Next.
10.Click to select the Open advanced properties for this task when I click FinishFinish. check box, and then click
11.Click the Task tab.
12.In the Run box, specify any additional parameters that you want to use with Shutdown.exe.
13.Click OK.
Alternatively, you can change the account used by the at command, as follows:
1.Open the Scheduled Tasks folder as described earlier in the "Workaround" section.
2.On the Advanced menu, click At Service Account.
3.Type the required account name and password, and then click OK.
Notes
This change will affect all tasks scheduled with the at command, not just Shutdown.exe.
The account used must have the SeRemoteShutdownPrivilege right on the local system.

STATUS

Microsoft has confirmed that this is a problem in the Microsoft products that are listed at the beginning of this article. This problem was first corrected in Microsoft Windows XP Service Pack 2.

Thursday, June 5, 2008

Beginners Guides: Setting up a FTP Server in WinXP

FTP is an easy way to transfer files over the Internet and in this guide we'll explains the basics of using it, and how to set up a home FTP server in WindowsXP - Version 1.1.0

If you've ever tried to share a large number of files over the Internet, you've no doubt noticed that it is not the easiest thing in the world to do. Sure you can use MSN messenger to send things… One file at a time. You could email, but that's slow and limited by the size of your mailbox. Create a website? Doesn't seem worth the effort, and besides what if you want to receive files as well as share them? What if you want to make several directories’ worth of your files available to yourself over the Internet while you are traveling? You could use remote desktop software, but that typically has anemic file transfer options and slow performance. What's the solution? Why FTP of course!

What is FTP? FTP simply stands for File Transfer Protocol. As you might guess, it's a method of transferring data over a network or the Internet.

As far as basic operations are concerned, it's very similar to HTTP or Hypertext Transfer Protocol, the protocol that brings you your daily diet of (PCstats) web pages. It requires a server to serve the information, and client computers must connect to the server at the correct port, provide the correct credentials and be using software that can understand the data to be transferred.

In the case of HTTP, you use Internet Explorer, or an alternative Web Browser like Netscape or Mozilla. For FTP, you require FTP client software like Bulletproof FTP, WSFTP, or CuteFTP. FTP is the backbone of file transfers on the Internet, but unlike HTTP, it provides a means of allowing clients to upload files as well as download them, and is considerably easier to set up and maintain.

Most businesses that have a need to transfer files maintain an FTP server, and most Web Hosting businesses use FTP to allow their clients to upload the web pages to their servers.

One good way to picture an FTP site is as a section of files and directories on your computer that you choose to publish like a web page, so that anyone with the correct username and password can access the directories and transfer files to and from them. In fact, with the Windows XP FTP client, accessing an FTP server is done through explorer, so the content of the server appears like just another folder on your system.

The main advantage of FTP is the ease with which it can transfer files over the Internet or your network. Individual files or whole directories can be made available, allowing clients to choose what they wish to access.

Accessing an FTP site using Windows XP and Internet Explorer.


Windows XP contains a built in FTP client, used through Internet Explorer, which you can use to access FTP sites as if they were directories on your computer. To do this, you simply need to enter the address of the FTP server into the address bar in Internet Explorer.

Let's take a closer look at a typical FTP address to see what it's made of: FTP://67.68.255.65 (this IP address doesn't exist, so no need to click ;-). This example address simply uses the IP address of the server computer, with the 'ftp://' at the start to inform Internet Explorer that it is looking to connect to an FTP site.

Controlling Anonymous Access

FTP can also use DNS (Domain Naming System) addresses, as seen on the World Wide Web. For example: ftp://ftp.pcstats.com would make Internet Explorer attempt to connect to port 21 of the computer 'ftp' in the domain pcstats.com.

If you are connecting to an FTP site that has anonymous access disabled, meaning that you will have to enter a username and password to connect successfully, you must put your username into the address. For example: ftp://mike@67.68.255.65 or ftp://mike@ftp.pcstats.com

Assuming the username is correct, a password window will open so you can authenticate yourself and then enter the FTP site.

If the FTP site you are trying to connect to uses an alternate port instead of the default port 21, you will also have to specify this. For example, if the server were using port 1056 you would enter: FTP://67.68.255.65:1056 or ftp://mike@ftp.pcstats.com:1056

Essentially, FTP addresses can be entered into the IE address bar just as you would WWW addresses, with the only catch being that you must put the ftp:// before the rest of the address, otherwise Internet Explorer will assume that you are trying to connect to a website and not an FTP server. Websites use port 80 by default.

Once you have connected to the FTP site, you are presented with a directory window of its contents, which you can manipulate as if it was a directory on your local computer (subject to the permissions you have in the FTP site, of course). You can open files, copy and paste into your other directories, and copy from your computer to the FTP site if you have write permission. Very simple.

Setting up an FTP site Using Windows XP Professional

Windows XP professional (as well as Windows 2000) includes Microsoft's IIS (Internet Information Server) which can be used to create an FTP site on your computer. It's a fair bit less complicated and less flexible than using some third-party FTP server software packages, so we will give you guides for setting up both. If you are using XP Home you will need to use third-party software. There is no way to publish an FTP site with the Home Edition of XP.

The first step is to check that IIS (Internet Information Services, Microsoft's web-server application) is configured properly.

Go to start\'control panel'\'add/remove programs'\ choose the 'add/remove windows components' button from the bar on the left. Highlight the item 'Internet information services (IIS)' If it is unchecked, check it, then click 'details.'


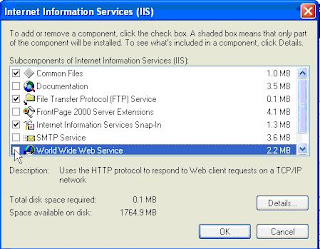
The components you will need are: 'common files,' 'file transfer protocol (FTP) service' and 'internet information services snap-in.' Uncheck any others then click next. IIS will configure itself, and you may be prompted for the XP CD.

Configuring the FTP site Controls

After IIS has been installed, an FTP site is automatically created for the directory 'c:\inetpub\ftproot.' Of course, this directory is currently empty. It is also completely unsecured, allowing anyone who enters ftp://(your IP address) in their browser or FTP client to connect to your computer. Next step is to configure your new site.

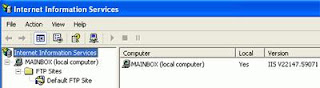
Go to start\control panel and select the 'switch to classic view' option in the upper left corner. From the classic control panel window, select 'administrative tools,' then 'internet information services.'

From here, expand '(local computer)' and 'FTP sites' until you have 'default FTP site' in the left hand pane. Right click on 'default FTP site' and select rename if you would like it to be called something a bit more catchy. After all, it's your site now.

Now, right click on your site and select 'properties.'

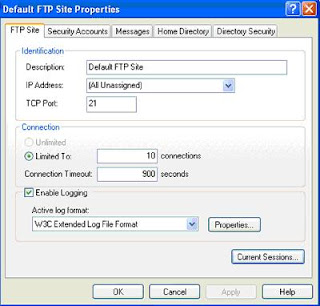
This window is the life-blood of your FTP site. Let's get familiar with it. The first tab, 'FTP site,' allows you to rename the site, set the port through which users can connect (leave it at 21 for now), set connection and logging information and view who is currently connected to your FTP site.

The connection section of this tab has two parts, the 'limited to:' box sets the maximum amount of users that can connect to you FTP site at the same time. Note that with XP Professional, the maximum is always 10 concurrent users. You can set this to less if you'd like.

WinXP FTP Security Controls

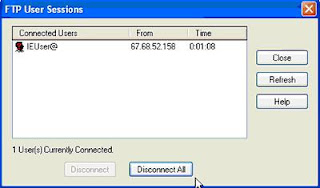
The 'connection timeout' box shows the amount of time a connected user will be allowed to remain idle before being disconnected. By clicking the 'current sessions' button at the bottom, you can view who is currently connected to your FTP site, and if you wish, disconnect them.


The next tab 'security accounts,' controls whether anonymous users (that means everyone) are allowed to access your FTP site or not. As mentioned above, by default anyone can access your FTP site without a username or password. IIS uses a built-in user account with a defined set of restrictions to authenticate anyone who connects. This user account, the 'IUSR_(computername) account, is created when IIS is installed, and is also used to allow access to websites you may publish. It is restricted from accessing non-IIS parts of your Windows system.

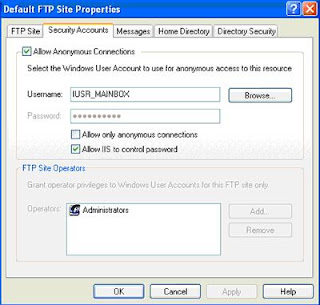
To be honest, there is not really a correct choice for this setting. If you allow anonymous access, anyone can connect to your FTP site and view any files that you place there. Disabling anonymous access has its own set of risks, however, which we will cover in the 'FTP security' section below. For now, leave anonymous access enabled. The next section, 'messages,' simply allows you to set various text messages which users connecting to your site will see. Fairly self-explanatory.

Third-party FTP software

The fourth tab, 'home directory,' allows you to configure which directory (folder) in your system will be accessed by the FTP site. In the 'FTP site directory' section, you can choose this directory, and designate whether connected users will have permission to write to and/or read from the site, and whether their visits will be logged.


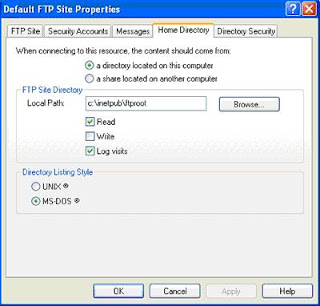
Choose the directory you wish to share files from, or leave it at the default and simply copy files you wish to make available into the directory using explorer.

Setting up an FTP site with third-party software

Since many PCstats readers may be using XP Home or Windows 9x/ME which do not include IIS and thus cannot be used to create FTP sites, we thought we'd run through creating an FTP server using third-party software. In this case we've chosen the popular Serv-U program by RhinoSoft.

We chose Serv-U because its personal edition is free for non-commercial use, and it is quite easy to grasp for neophyte users. Serv-U offers some additional security and flexibility over the IIS implementation of FTP, at least with Windows XP. Let's look at setting it up...

Once you have downloaded and installed the software, start it up. The setup wizard will run. Press 'next' three times to start the FTP server. You will be prompted for your IP address. Leave it blank. Press 'next.'

You are asked to name your 'domain' (Serv-U's name for your FTP site). Choose whether you wish Serv-U to start automatically when you boot Windows, or to start only when you run the program from the desktop.

Configuring Serv-U

The next screen brings the first major difference between Serv-U and Microsoft's IIS. You are asked whether you wish to allow anonymous access, meaning that anyone will be able to log into your FTP site by using a special 'anonymous' user account created for this purpose.

The difference here is that the anonymous account created resides only within the Serv-U program, as do all other accounts you will create for accessing this FTP site. Separating Windows user accounts from the accounts you create to access the FTP site adds a layer of security. If you do not choose to use anonymous access, you will have to create user accounts within Serv-U with permission to access you site. More on this in a moment...

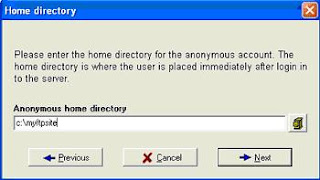
If you elected to allow anonymous access, you will be prompted for a directory, which will serve as the 'home base' for anonymous users. When they connect, they will see the directory you specify here first.

Once you enter the directory you will be asked if you wish to limit anonymous users to this directory only, or allow them to browse through to other directories. This brings up the second major difference between Serv-U along with most other third-party FTP servers and the Windows implementation of FTP: you are not limited to a single directory.

Of course, you may want to be limited to a single directory, as it makes keeping a handle on things much simpler, but we digress. For the time being, choose to lock anonymous users into the directory you specified.

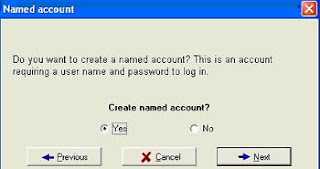
You will now be prompted to create 'named accounts' which are user accounts with passwords analogous to those seen in Windows, except that these are used only for FTP access within Serv-U.

For the time being, create a named account and password of your choice and give that user a different initial directory than the one you previously assigned to anonymous users. When prompted, choose not to lock the named user into his home directory. The final question the setup wizard will ask is whether you wish to give the user you just created any administrative privileges, allowing him to configure the FTP site remotely. We will answer 'no' to this one for a simple reason. Remote Access is disabled in the 'personal' edition of Serv-U.

The version you are using is the evaluation version which contains all the features of the Professional edition, but reverts to the personal edition if not purchased within 30 days. This tutorial is based around the features available in the personal edition.

Creating FTP User Accounts

Once you have completed the setup wizard, you will be presented with the full Serv-U window. Your FTP site is now up and running. Test it from another computer using the method listed in the first section.

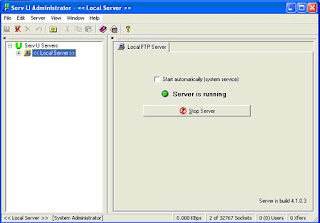
As you might notice, it's a good deal more complicated than the Windows implementation of FTP. The first thing we will do here is expand 'local server' and 'domains' until you can see the domain that you created. Expand that too.

While we don't have the space to go over all the options available to you in this program, we will cover a few important ones. For more help, consult the Serv-U help files or their website. First, in the 'settings' menu, go to the 'IP access' tab. This section allows you to block or allow individual computers to access your site based on their IP address.

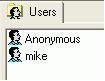
The 'activity' option allows you to view users connected to your domain. By right clicking on a connected user, you can send a message to him or her, disconnect them, stop their data transfers or even eavesdrop on the commands they are sending to your server. The 'users' option contains the user accounts you have created within Serv-U.

You will notice that the anonymous account is here, along with the named account that you created. Select the named account in the left-hand pane. From the user properties menu, you have several options: From the 'accounts' tab you can disable users and change their home directories.

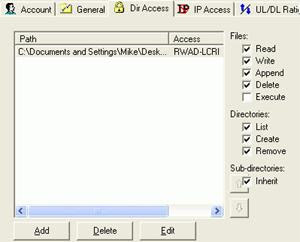
The 'directory access' tab is extremely important, as it controls the rights this user will have once he is connected to your FTP site. For example, if you only wish clients to be able to read and copy files from your FTP site, give them the 'read' file permission and the 'list' directory permission. If you want them to be able to add and edit files, you must assign the 'write' and 'append' file permissions, etc.

This gives you a good starting idea of how to use Serv-U to set up your own FTP site. Be aware that the version you are using will revert to the personal version after 30 days. The limitations of the personal version are: 1 domain only, maximum of 5 users, one concurrent connection only, and no encryption. None of these are a problem if you wish to create a site to enable you to access your files remotely or allow a friend to download from your system.

FTP and firewalls

If you use some form of hardware or software firewall to protect your computer, you will probably need to do a little more work to get FTP to operate correctly.

Software firewalls and FTP

The two most common software firewalls are the built-in Windows XP firewall and Zonealarm by Zone Labs. To configure the Windows XP firewall to allow FTP access: Go to start\control panel\network connections, right click on the icon for your Internet connection and select 'properties.'

Go to the 'advanced' tab and click the 'settings' button to configure your firewall (ensure that the firewall is enabled first; if it is enabled there will be a check in the 'protect my computer…' box).

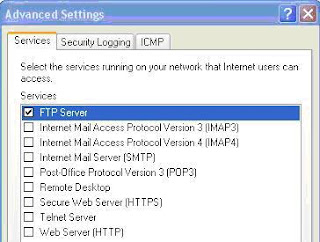
From the 'services' tab, simply place a checkmark in the 'FTP server' box. This will allow FTP traffic on port 21 to enter your computer. Press 'ok.'

To configure Zonealarm to allow FTP access


From the main Zonealarm window, select 'program control.'

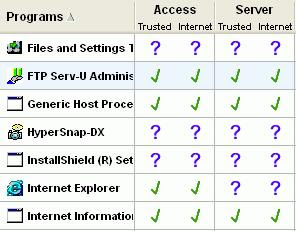
If you are using Window's built in FTP server, you need find the entry for 'internet information services' and place checkmarks next to 'access\internet' and 'server\internet.'

If you are using Serv-U or some other third party program, locate the program on the list (if it is not present, click 'add' and browse to the program's executable file to add it to the list) and again place checkmarks next to 'access\internet' and 'server\internet.'

This will allow your FTP site to send and receive information through the Zonealarm firewall.

Configuring hardware firewalls for FTP

Home Internet sharing devices like Cable/DSL routers are very common, and almost all come with some form of firewall that is enabled by default. To successfully pass FTP traffic through these devices, you will need to create a 'virtual server' entry in the setup of your Internet sharing device. Pictured below is an example of this from an SMC Barricade home DSL/cable router.

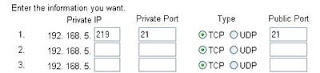
A virtual server is an instruction to your Internet sharing device telling it to forward any traffic it receives on a specified port to a specific computer inside your network. For example, if you create a virtual server for port 21, IP address 192.168.5.220, your internet sharing device will listen for traffic coming in on port 21, then pass that traffic through the firewall to the computer with that IP address.

Though the instructions will vary depending on the brand of your device, what you will need to do is find the 'virtual server' setup section (or equivalent), and specify the IP address of the computer that is running the FTP server (to find this, go to start\run and type 'cmd' then 'ipconfig.'). You will need to enter port 21 for data coming into and out of the router.

Once this is saved, FTP information will be able to pass through your firewall. For more information on firewalls and their configuration, see our Beginner's guide to firewalls and Internet security here.

FTP security

Important topic. The problem with FTP is that, by default, it is an extremely insecure protocol. Usernames and passwords are not encrypted in any way when they are sent from the client to the server, and so are prime targets for anyone intercepting network packets between your server and your clients.

This is the reason that the Windows FTP server software recommends that you use only anonymous access for your FTP site, as the alternative is to use valid user accounts from your XP installation.

If these credentials are intercepted, they could be used to severely compromise the security of your entire system, never mind your FTP site. Hence the recommended practice for home users is to allow anonymous access to the FTP site directory and simply not place sensitive files there. Obviously, this is not going to meet everyone's needs, so there are alternative methods of securing FTP transactions.

Generally speaking, these involve using SSL (Secure Socket Layer) or some other encryption method to encrypt the plain FTP information, creating a secure channel between the client and server. Ffor more information on SSL and other methods of encryption, see PCstats' Beginners Guide to encryption here .

Most third-party FTP server software packages support encryption as part of the FTP program itself, but using IIS for Windows XP, the only possible method of security is to use a method that encrypts all traffic between the server and a specific client, such as a VPN (Virtual Private Network).For more information on how to set up Virtual Private Networks, see PCstats' Guide.

Serv-U supports creating an SSL certificate within the program for encrypting traffic, but only in their commercial versions of the program. The free personal edition does not have this feature.

So to sum up, unless you have specifically placed security measures, assume that all FTP traffic is inherently insecure. Therefore, don't put data in your FTP site that you would not want seen by the general public. Don't be scared away from it though, since the fact that anyone can access your FTP site does not affect the security of the rest of your system unless you are using your Windows user accounts with IIS.